Dezine DZ-GR100-WHT-BRW Men's Watch

Saturday 31 May 2014

windows 7 beginners guide

Posted on 01:49 by Unknown

hide and unhide System tray icon's

Icons of windows stat up items like network,system message and antivirus,sounds etc..are minimized in system tray here the simple tips to hide and unhide icons in System tray.

Windows 7 allows you to hide and unhide icons in system tray using  simple Drag and drop method
you just click on icon and drag it into the system tray.

How to add/remove icons in windows 7 task-bar:
would you like to enable some of your favorite applications in windows task-bar?here the
simple steps to enable/disable icons in task bar.

STEP'S to enable Icons in windows Task-bar:
enabling icon's in task-bar is so easy just click on the icon you want to enable in task-bar tan drag
it on task-bar.
enable Icons in windows Task-bar

STEP'S to disable Icons from windows Task-bar
if you want to disable some unwanted icons from windows task-bar then right click on that
task-bar icon then select unpin this program from task-bar
disable-Icons-from-windows-Task-bar

FOR MORE TIPS AND TRICKS

HOW TO SPEED UP WINDOWS 7


Thursday 29 May 2014

how to compress files using winrar

Posted on 04:17 by Unknown
sometimes you are looking t compress certain files to reduce that size with out loosing quality
WinRAR is the best tool reduce all kind of file size without loosing it's Quality.
how-to-compress-files-using-winrar

here the simple steps to compress files using WinRAR

STEP 1:
            go to the file you want to compress.

STEP 2:
            right click on that file then select Add to archive...from right click window
how-to-compress-files-using-winrar/winzip

STEP 3:
            now archive name and parameters window will open under that change compression
            method to Best
compress-files-using-winrar


STEP 4:
            finally click on OK button.it takes some time to complete compressing process.

Tuesday 27 May 2014

make your own QR code for your website/applications

QR code is an best way to boost your business and website traffic through mobile/social media. nowadays android and IOS plays
major role in mobiles you can read this QR code using android/IOS/windows mobiles.

here the simple steps to create your own QR code:

STEP 1:
           click here to go QR code generator  STEP 2:
      under that website
       1) select your datatype
       2)enter your URL
       3)set your visibility.
     
make your own QR code for your website/applications
STEP 3:
           that's it it will automatically generate your QR code

STEP 4:
           now you can download this code in .png image format
           you can use this into your website,social media and business cards...
STEP 5:
           you can read this code using the application like neoreader.

Thursday 22 May 2014

kochadaiyaan theme free download

Posted on 22:21 by Unknown
1. kochadaiyaan tamil movie theme for your chrome browser free download:
kochadaiyaan-movie-theme-free-download
  link to download above theme
https://www.mychrometheme.com/t/mzyfli3g9qdisxucm7vn6c99


2.kochadaiyaan tamil movie theme

  link to download above theme
https://www.mychrometheme.com/t/im3k1f05xojm35zy4rhtpgmv 3.kochadaiyaan tamil movie theme free download
 link to download above theme
https://www.mychrometheme.com/t/3p0fmt6rbiinh3uhlaihwscz0

how to trace unknown caller on cell phone

Posted on 03:29 by Unknown
how to find unknown caller details

True caller is  one of the worlds largest mobile phone number community.it helps to find the details about unknown callers.ever you get a call from unknown number it is a great idea to finds the detail about that number.

STEP 1:
           click here to go True caller website
trace-unknown-mobile-number-datas

STEP 2:
           enter the mobile number you want to search then click on search icon
how-to-trace-unknown-mobile-number-datas

STEP 3:
            True caller ask you to sign in...sign in with Facebook (or) Google account

STEP 4:
            now True caller shows the detail about your search result
how-to-trace-unknown-mobile-number

it will help you to finds the detail about unknown number calls,Now True caller application is
available  for all popular mobile platforms. if once you install True caller application on
your mobile it will automatically shows the details about mobile numbers when you get a incoming call/message

Airtel launches unlimited night pack for 2G/3G users

airtel is the one of largest mobile network provider in india . provides 2G/3G network to
their  users. airtel has more then 20 crore users within india.
now Airtel has launched unlimited night plans for their users.
airtel-unlimited-night-plane

all the benefits of this pack will applicable from 12am (midnight) to 6am.

and it valid for 1 night

and this pack applicable for prepaid users only

night call (airtel-airtel)--------> Rs.7

night 2G Data --------------------> RS.8

night call+2G data----------------> Rs.15

night 3G data(limited 500mb)------> Rs.29

night 3G data(1 GB)---------------> Rs.49
(till now it is cheapest 3G plan in india)

to active this service pack: dial 129 (or) *129#

for your  confirmation click here

Wednesday 21 May 2014

here the simple steps to o create custom you tube channel URL

If you are looking to create a  custom URL for your you-tube channel URL from your default URL
how-to-create-custom-url-for-youtube-channel

EX:

Default URL
http://www.youtube.com/channel/UCNimsidofP5tdka3a9ze6ew

Custom URL:
https://www.youtube.com/user/digitalstyx
just follow the given steps to create YouTube custom URL

STEP 1:
       sign in into your YouTube account

STEP 2:
           Go to this given URL
           https://www.youtube.com/account_advanced
how-to-create-custom-url-for-youtube-channel

STEP 3:
            under that Go to channel settings then click on Create custom URL link

STEP 4:
            now enter your custom channel name then click on create channel URL button
create-custom-url-for-youtube-channel

STEP 5:
            it will generate your custom channel URL it's looks like following URL
            https://www.youtube.com/user/digitalstyx

STEP6:
           adding /videos on end of the URL it will display only the video files
           https://www.youtube.com/user/digitalstyx/videos

Tuesday 20 May 2014

how to create bootable usb windows xp/7/8

Posted on 22:37 by Unknown
how to create bootable usb for windows xp/7/8
how-to-create-bootable-usb

here the simple method to create bootable usb using RMPrep software...

STEP 1:
            click here to download full version of RMPrep and install it on your pc STEP 2:
         

how to create own chrome theme

Posted on 02:32 by Unknown

how to create own chrome theme:

Google chrome is one of the best browser in world because it's user friendly interface
and it loading time consumption.here the simple steps to make your chrome browser more
beautifully with your own theme.

Google provides free chrome application to create themes

STEP 1:
           click here to install Google chrome theme creator. STEP 2:
            here click on + FREE button then select ADD from popup window it will automatically reload
            your browser and redirected to chrome://apps page here you can see my chrome theme application
how-to-create-themes-for-chrome


STEP 3:
           now click on chrome theme application --->then select START MAKING THEME
how-to-create-themes-for-google-chrome

STEP 4:
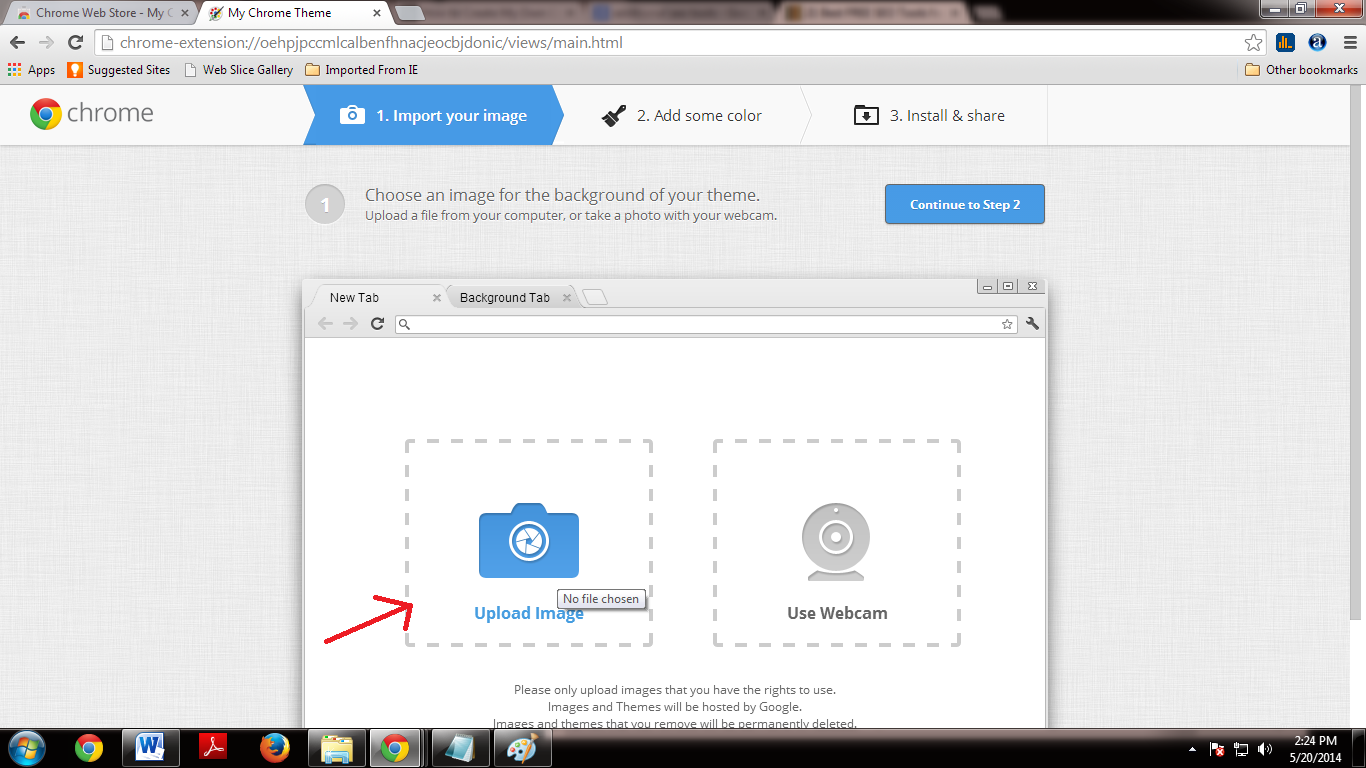
            click on upload window then select your own image from your system
           
how-to-create-themes-for-google-chrome-technology-tips
        then click on Adjust position tab then select Fit to screen

STEP 5:
            now select preview mode.then click on continue to Step2 button
how-to-create-themes-for-google-chrome-free

how-to-create-themes-for-google-chrome-tech tips and tricks

STEP 6:
           here you can edit toolbar color,new tab color and frame color after completion of editing process
          click on continue to Step 3 button
how-to-create-themes-for-google-chrome-tricks
STEP 7:
            here enter name for your theme then click on make my theme button
            it will create your theme now you can install and share your own theme...

how to play games without graphic card

Posted on 00:12 by Unknown
how to play games without graphic card

some of the games created with more graphics property.you can't play this games without
additional graphics card. here the simple solution to play all kind of games without
additional graphics card. 3D analyzer is an emulator it helps you to play all type of games
without additional graphics card
how-to-play-games-without-graphic-card

STEP 1:
       click here to download 3D analyzer

STEP 2:
      click on downloaded file and run analyzer.exe

STEP 3:
      now click on "select" button then open file path of the game you want to play

STEP 4:
      now click on RUN button....now you can play your Highresalution game on your low graphics
      card system

Monday 19 May 2014

how to use a smartphone as a web camera

Posted on 04:26 by Unknown
how to use a mobile camera as a webcam
here the trick to use your mobile camera as a webcam
how-to-use-a-smartphone-as-a-web-camera

STEP 1:
            install  EpocCam application on your mobile click here to download for mobile 

STEP 2:
           EpocCam webcam application is available for iPhone,android ,and windows mobiles.

STEP 3:
           install driver on your pc
           click here to download  driver for your windows pc. STEP 4:
            After completion of installation process on both mobile phone and PC connect your phone to your      PC  using            USB cable in PC suite mode.

STEP 5:
            Now go to your phone click and start epoccam application.

STEP 6:
            Parallely start epoccam application on your PC.

STEP 7:
            Now you can enjoy  video chatting/recording using your mobile as a webcam.

How to cancel/recall sent mails on gmail

Posted on 01:55 by Unknown
How to cancel/recall sent mails on gmail:
undo-cancel-sent-mails-on-gmail

some times unexpectedly sends mail without filling data's (or) wrong data's here you are trying to stop this mail but you can't.
here the simple trick to recall/cancel your sent mails.by default this feature is disabled in your gmail so, you will need to enable this option. once it is enabled you can use recall/undo feature in gmail. you can use this feature within 30 seconds only.if you took longer then that time you will not able to recall it .so,mind this you can recall a mail within 30 sec from sending it.


STEPS TO ENABLE RECALL OPTION IN GMAIL:

STEP 1:
       login to your Gmail account.

STEP 2:
       Go to setting window by clicking on gear button at the right top of the gmail page.
how-to-undo-cancel-sent-mails-on-gmail

STEP 3:
       click on the labs tab from listed tabs

STEP 4:
       scroll down the page then select enable  option for "undo send"

STEP 5:
       scroll down and click on save changes button.
       now your page will automatically reload and bring you to the inbox page.
how-to-cancel-sent-mails-on-gmail

STEP 6:
       once again click on "setting" from the general tab scroll down to undo send option
       set send cancellation period as 30 seconds.
how-to-cancel-sent-mails-on-gmail-account

STEP 7:
       scroll down and click on save changes button.
       now you can able to recall your sent mails within 30 seconds from sending

STEP 8:
            here you can see undo link after sending mail .if you want to recall your mail click on this link

Thursday 15 May 2014

how to set Google as my homepage in chrome

Posted on 05:01 by Unknown
how to set Google as my homepage in chrome
some time you are interrupted by some unwanted tool bars like ASK.it displays some ads and it redirect your URL's here the simple steps to uninstall ask  or any other toolbar and make GOOGLE as your home page URL

STEP 1:
      Go to Google chrome setting window
how-to-set-google-as default-home-page

STEP 2:
      under that click on Show advanced settings...
how-to-set-google-as default-home-page-in-chrome

STEP 3:
           then click on Reset browser settings
STEP 4:
          now chrome sets Google as your default home page and automatically uninstall all tool bars.

STEP 5:
      if you wish to set any-other page is your default URL

STEP 6:
       scroll up and go to search then select your default search engine from drop down list
how-to-set-google-as-default-home-page-in-chrome

Tuesday 13 May 2014

How to uninstall default apps from android mobiles:

Android is an widely used operating system because it's user friendly interface and lakhs of free applications
when you buy a new android mobile it comes with some default application some of it's may not used for you but android operating system not allows you to uninstall this application.
how-to-delete-android-root-apps

here the solution for your problem:

 ROOT APP DELETE is application it helps you to uninstall default applications from your Rooted mobile

click here to download this application on your mobile
when you open this application it will asking you to  permission for SUPER-USER.give access as super user If you cant find your device asking for SUPER-USER don’t worry for some mobile it will automatically get super user permission access

Now with the help of this application you can uninstall Root apps.

(Note:this application only works on Rooted android Devices)

Saturday 10 May 2014

I hope every one of you using pendrive or memory card to keep your dada's. both pendrive and memory card are external storage devices it's helps to transfer data's from one to another place or system.some times pendrive may affected by shortcut virus while transferring data's .here the trick to remove shortcut virus from your USB drive or memory card.
virus infected files are looks only the shortcut you can't access this files and some files will be hidden.here the
simple command prompt cmd to remove shortcut virus.using this method you can able to remove shortcut virus and getback your
hidden files

STEP 1:
         plug your pen drive in to computer

STEP 2:
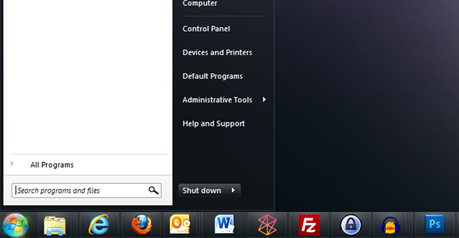
           press CTRL+R (or) go to start menu type cmd on search-bar then select  cmd from search result                  right click on that then select  run as administrator.
how-to-remove-shortcut-virus

STEP 3:
            now run window will open type cmd then press enter.

STEP 4:
          now command prompt window will open with default path(c:) change it with your pendrive  letter

STEP 5:
          for Example (your pen-drive letter is G:)
          type G: then hit enter
how-to-remove-shortcut-virus-from-pendrive

STEP 6:
          now type following command "attrib -h -s -r /s /d k:*.*" then hit enter it takes some time to complete             this   process.

STEP 7:
          after completion of process re-plug your drive now you can see your files.

Wednesday 7 May 2014

how to add pinterest to blogger posts

Posted on 01:52 by Unknown
how to add pinterest to blogger posts:

STEP 1:
       Login to your blogger account

STEP 2:
           In your blogger Dashboard Go to Template under that click on EDIT HTML

STEP 3:
             click here to download pinterest code copy and past it into your blogger template code just right                   above </body> tag.
STEP 4:
             finally click on "save template" button

STEP 5:
            now go to your blogger page reload it one (or) two time here you can see pinterest share button right             above yor images

Tuesday 6 May 2014

Android is an widely used mobile operating system it is based on Linux opensource operating system.
it is used in smartphones and tablets.most of mobile users having android mobiles because of it's user friendliness and free applications.
in some cases you want to backup your data s from your mobile.

way to Backup your data s from your mobile

Method 1:
          Backup Data s in Memory Card

Step 1:
       click on contact icon from icon menu

STEP 2:
      click on  option's menu then select "Backup contacts" then here you can see "memory card" option

STEP 3:
      if it ask permission to create a vcard,click yes.
STEP 4:
      now your contacts Will be backup On your memory card.

Monday 5 May 2014

how to directly download android apps on pc

Posted on 03:51 by Unknown
android is the widely used mobile operating system most of the mobiles runs with android operating system
the main reason is its user friendliness and it lakhs of free applications and also it is an free operating system(opensource)
how to directly download android apps on pc


here the trick to download playstore application directly on your computer

Steps to download Google play store application on your PC:

STEP 1:
          Go to the following URL and then click on recommended application then copy the application  URL
          https://play.google.com/store/apps


STEP 2:
           Go to the following URL
            http://apps.evozi.com/apk-downloader/
STEP 3:
           paste URl in to search bar.

STEP 4:
           click on Generate Download button link to Download application directly to your pc.
trickto directly download android apps on pc

STEP 5:
            once you complete all the details click on Download button
STEP 6:
            your Download begins now...
Sometimes, when you plug a USB device to your Windows system, you may get the USB Device
Not Recognized 
pop up message.If your USB device is not detected here the solution to solve this problem
usb device not recognized

STEP 1:
       Go to start menu-->Run--> type devmgmt.msc-->Enter

STEP 2:
       now Device Manager window will appear under that click on Action-->then select Scan for hardware changes.

STEP 3:
       Open Control Panel -->select  Printers and devices then Check if you can see any entry for Unidentified USB device or Unknown Device
   
STEp 4:
           Open USB device Properties and update it's driver, if an update is found to be available.

How to Update USB Drivers in windows 8:


In order to update USB drivers in Windows 8, simply follow the given steps:

STEP 1:
             login to Windows 8 computer Desktop with the administrator privilege.
             on the desktop screen, move mouse pointer to the bottom right corner of the Desktop window.

STEP 2:
            From the displayed options-->click Settings.

STEP 3:
           Go to the Settings pane under that click Control Panel.
STEP 4:
          now control panel window will open from that window-->select the option  Hardware and Sound. STEP 5:
           select Device Manager<--from Devices and Printers category
STEP 6:
          On Device Manager window-->select the Universal Serial Bus controllers category.
STEP 7:
           Once expanded, right-click on the USB controller that is to be updated.
STEP 8:
           From the context menu click on Update Driver Software to update the driver of the selected USB                controller.

On the displayed box, click Search automatically for updated driver software to make the Windows to search for the updated driver from the Internet.

Wait up-to the selected driver gets updated , then click Close.

Note:internet connection is must for updation.

Saturday 3 May 2014

Sometimes your USB devices may get some errors like this "disk is write protected" it does not allows you to format your device.
disk is write protected usb error solved


can't find the key StorageDevicePolicies? you have to create it manually.


STEP 1:
            Go to Start menu-->run-->then type regedit-->enter

STEP 2:
             then now your system regedit window will open  Right-click HKEY_LOCAL_MACHINE--                        >SYSTEM-->CurrrentContro­lSet-->Control--> and select New Key.

STEP 3:
             rename the file to StorageDevicePolicies.

STEP 4:
            right Click on the StorageDevicePolicies and select New DWORD and give it the name                                 WriteProtect.
STEP 5:
            Double click onWrite Protect and set its value to 0.

STEP 6:
           now format your USB drive before doing any changes.
method 2:
Sometimes,your usb drive is not allows you to copy paste files from a computer. And here the  solution to
fix the Disk Is Write Protected error .

 Follow this STEP'S To solve this problem,
STEP 1:
             go to My Computer --> your USB > right click and then properties.
STEP 2 :
             Go to security Tab under that select user--> edit and then click all the check box on the left side to                allow full control.
STEP 3:
             Now click on Ok--> and now you can use your USB with full permission.
Method 3:

if you are using transcend products like memory card/usb drive this method will helps you to solve your problem.transcend provides a tool to remove write protection to any transcend products.

STEP 1:
       click here to download online recovery tool

STEP 2:
      after completion of downloading process plug USB drive on computer then run recovery toolon your computer

STEP 3:
            
      Now select any one option from the listed two options. If you want to remove data and write protection then choose first option from list.
      This option will remove all the data's and write protection.

STEP 4:
      If you want to remove write protection only then choose second option from list, this one only remove write protection
      from the pen drive and keep your data safe.

STEP 5:
       after selecting desired option on recovery tool click on start button to complete the formatting process.

     In this way you can remove write protection to any pendrive/memory card. 


09 10 /